Unified Enterprise Survey
5-3600-152.3: 2012-02-16
Personalized Electronic Reporting Questionnaire System (PERQS)
User Guide for Electronic Data Reporting
User Guide Contents
About PERQS
Tools needed to use PERQS
Accessing the 2012 version of PERQS for the first time
Decrypting the company data file
Opening PERQS
Completing Part A of the questionnaire
Completing Part B of the questionnaire
General information
Exporting and importing
Closing the questionnaire
Returning your company data to Statistics Canada via Internet
Accessing the e-File Transfer Service
Appendix A
Appendix B
Appendix C
Appendix D
PERQS – User guide for electronic data reporting
About PERQS
Welcome to Statistics Canada's electronic data reporting system for the 2012 Annual Retail Trade Survey. This system, referred to as PERQS (Personalized Electronic Reporting Questionnaire System), is comprised of preloaded encrypted Excel spreadsheets stored on an electronic Statistics Canada vault. A tool allows you to decrypt the spreadsheets to get started, then the e-File Transfer Service allows you to securely send them back to Statistics Canada via the Internet (see page 13, Returning your Company Data to Statistics Canada).
Information from your previous year's report: (business name(s), addresses, square footage, contacts, reporting period, etc.) has been pre-loaded into PERQS.
Also stored in the same Statistics Canada vault are guides to use PERQS; reporting guides for the questionnaire; a North American Industrial Classification System Guide and the decryption tool called ETUNPROT.exe.
Tools needed to use PERQS
PERQS was designed to run in a Windows 95 or higher environment and requires Microsoft Excel 97 or higher. If you do not have access to a PC with Windows installed on it, or if you do not have Microsoft Excel 97 or higher, you will not be able to use PERQS.
In order to read the Reporting Guide: 2012 Annual Retail Trade Survey and the NAICS (North American Industrial Classification System), you must install Adobe Acrobat reader. If you do not have Adobe reader installed, it is available as a download from www.adobe.com. You will also need access to the Internet.
You should have received a letter containing your password, a series of 9 randomly generated characters. This password is unique to each PERQS package and is needed to decrypt the PERQS company data file. If at any time you lose or forget your original password, please call our toll-free Help Line at 1-800-949-9491 for instructions or email - - SOS@statcan.gc.ca.
If you do not wish to have PERQS pre-loaded with information from your previous report, please advise us.
Thank you for taking the time to respond to the 2012 Annual Retail Trade Survey.
Note to users:
Please uninstall any previous versions of PERQS from your system before accessing the 2012 version of PERQS.
To uninstall previous PERQS versions from your PC's hard drive:
1. From the Windows Start menu, select Settings;
2. In the Control Panel, select the Add/Remove Program icon;
3. Select STCDRF;
4. Click Remove.
Accessing the 2012 version of PERQS for the first time
1. From the Internet, go to URL http://www.statcan.gc.ca/ec-ce/eft-tef. Click the Logon button.
2. Enter the username that was provided by Statistics Canada.
3.Enter temporary password that was provided by Statistics Canada. Click the Logon button.
4. Your password will expire and an error message is displayed in red
(Error: ITATS203E Password has expired) and you will be prompted to enter a new one*.
5. Enter the new password.
6. Re-enter the new password to confirm.
7. You will see a list of safes.
8. Click on the safe of your choice.
9. To download files, click on FromStatcan-->Download, and then browse for the files you want to download to your computer. Please save the decryption file, ETUNPROT.exe, to your desktop. Please save the other files (especially the ".xls.enp" file) to a location of your choice (e.g. "C:\PERQSTemp\DownloadedFiles").
Note: Some respondents may receive a security message asking if they want to run or save the etunprot.exe file. Please choose the SAVE option.
10. Logout.
* Password must be at least 8 characters with at least one capital letter and one digit.
Note: if you have a problem using the e-File Transfer service, please send an e-mail to the support team at: SOS@statcan.gc.ca.
Decrypting the company data file
1. After the PERQS excel (.xls.enp) file and the decryption program have been downloaded to your computer, execute the decryption file, ETUNPROT.exe, by double-clicking the icon on your desktop. This will cause the following window to appear (see Figure 1).
Figure 1
2. Browse to the location that you downloaded the files to and select the file you have saved "your file name.xls.enp" then select the Open button.
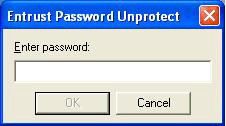
3. You will then be prompted to enter a password (see Figure 2). This password was written on the letter that was sent to you in the mail.
Figure 2
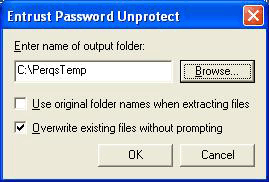
4. You will then be prompted to save the data file to a location of your choice (see Figure 3).
Figure 3
5. Fill in the questionnaire (see below for instructions). The Reporting Guide (found on the Statistics Canada electronic vault) can assist you in completing the questionnaire.
6. After completing the questionnaire, follow the "Returning your company data to Statistics Canada via Internet" instructions.
Opening PERQS
PERQS 2012 was developed using Microsoft Excel 97 and therefore requires that either Excel 97 or higher be installed on your PC.
When your customized questionnaire information on the company data file is decrypted, please locate it using Windows Explorer and double click on it (Excel should automatically open your questionnaire).
Alternatively, open Microsoft Excel, and go to File -> Open. Locate the questionnaire using the Excel browser. When the questionnaire is opened, the following message (Figure 4a) will appear:
Note: For users of Excel 2007 / 2010, see Appendix D "Using Excel 2007 /2010 to open the questionnaire and use the macros".
Figure 4a
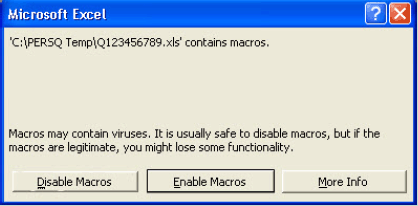
Activate the user-friendly macros developed by Statistics Canada by clicking Enable Macros
Disabling macros will make it impossible to fill out the questionnaire. Instructions will appear on the screen, as shown in Figure 4b.
Figure 4b
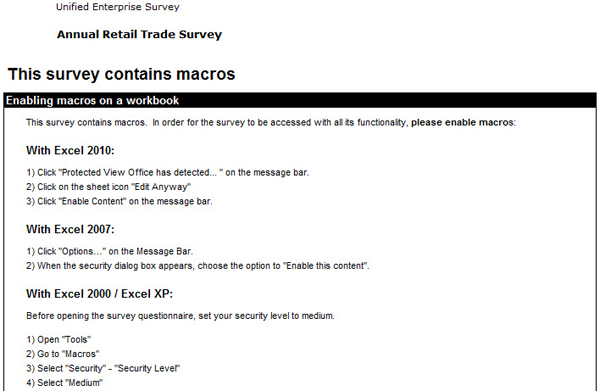
You now have full access to PERQS which is made up of two Excel spreadsheets, identified as Part A and Part B. When the questionnaire is opened, Part A will be displayed. In the upper left hand corner you will see the title 2012 Annual Retail Trade Survey.
Completing Part A of the questionnaire
The questionnaire text in PERQS is black on a coloured background. The coloured boxes contain instructions, information and/or questions. The white boxes are reserved for your answers.
The easiest way to move through PERQS is to use theTabkey. It will take you from one white box to the next, from left to right and from top to bottom. This is the order in which you should answer the questions.
Shift +Tab enables you to go backwards. Using the Enter key is not recommended, as it does not allow you to go from one white area to the next; instead, the Enter key takes you to the cell below in the next row down.
Some white boxes may contain information collected in previous years. Please verify the information and make the necessary corrections. To change it, please overwrite the content of the cell by entering the corrections.
You will also see several additional buttons displayed on the menu (see Figure 4c). Go to Part B will move your cursor to the second Excel spreadsheet, entitled Part B. Save and Close closes the application (see Closing the questionnaire on page 12). Save saves the current session on your hard disk. Next Error moves your cursor to the next cell in error.
Note: For users of Excel 2007 / 2010, see Appendix D "Finding additional buttons when accessing Part A and Part B of the questionnaire".
Figure 4c

Some cells may contain a small red triangle in the upper right hand corner. When you point your cursor over this red triangle, a dialog box containing additional information about this cell will appear (see Figure 5).
Figure 5

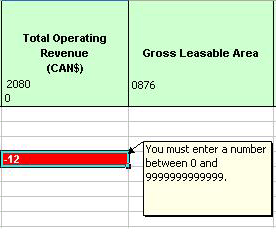
If PERQS assesses that the information collected is erroneous, the cell turns red. When you move your cursor over it, a dialog box containing the information of the erroneous cell will be posted (see General Information section).
You will have the option of coming back later by clicking the Next Error button at the top of the worksheet. Next Error will allow you to navigate between all the possibly erroneous cells in Part A.
You may now complete Part A by following the instructions on the questionnaire. Once Part A is completed, please go to Part B by clicking the appropriate button on the top menu or by selecting the sheet tab entitled Part B at the bottom of the worksheet.
Completing Part B of the questionnaire
Part B is designed to capture detailed information on each retail chain store. Many additional buttons also appear in Part B (see Figure 6a).
Note: For users of Excel 2007 / 2010, see Appendix D "Finding additional buttons when accessing Part A and Part B of the questionnaire".
Figure 6a

Go to Part A moves your cursor to the first Excel spreadsheet entitled Part A. Close closes the application, Save saves the current session on your hard disk and Next Error moves your cursor to the next cell with an error.
Sort A-Z will allow you to sort the content of the selected column in alphabetical order. Sort Z-A will sort in the reverse order. Please note that you can only sort one column at a time.
Recode ID, Export ID, Import and Export are explained on page 11.
Part B is divided by store, and the information collected for each store is on the same line. As in Part A, the sheet already contains information collected over the years. To change it, simply overwrite the content of the cell by entering the corrections.
Columns containing store addresses and company IDs appear twice. Columns appearing in colour are protected and reserved for use by Statistics Canada for processing purposes. Use blank store address and company ID columns to update information.
To add a new location, use a new line at the bottom of the spreadsheet.
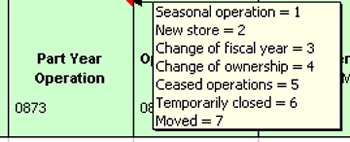
If a store has gone out of business, you must indicate this in the column headed Part Year Operation. This application does not allow you to delete stores.
For Part Year Operation (see Figure 6b), enter the number corresponding to the correct description. The numbers and their descriptions are available by moving the cursor to the top of the red triangle located in the header of the column as illustrated in Figure 6b.
Figure 6b
In Part B, it is recommended that you use the Tab key for browsing. By using the Tab key, you can move through all the boxes for the same store before moving to the next.
When Part B is completed, you can either return to Part A or save and close the questionnaire so that it can be sent to Statistics Canada (see Closing the questionnaire on page 12).
General information
Error message
Error messages identifying inconsistencies in your answers may appear at various points while you complete the questionnaire. Please read the messages and correct the erroneous information.
Also, when PERQS assesses that the data entry is erroneous, the cell turns red. When you move your cursor over the cell, a comment box containing the information on this erroneous cell is posted (see Figure 7a).
Figure 7a
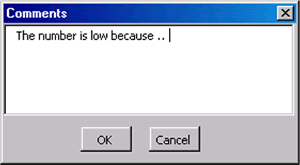
It is possible that some of your data will seem inconsistent according to PERQS. If this happens, explanations for particular questions may be provided in the comment box (see Figure 7b). Providing such explanations means that Statistics Canada might not have to contact you to obtain more details about the information.
Figure 7b
You may also include additional comments in Section G ofPart A.
Printing the questionnaire
To print your questionnaire select Part A or Part B. Then, select File -> Print in the Excel menu.
Since every printer has its own configuration, you may have to adjust your margins to print a presentable document. Also, in Part B, due to the amount of information included, we recommend that you use the Export option for better printing capabilities.
Exporting and importing
Recoding ID and exporting ID
In Part B of PERQS you will see 2 buttons entitled Recode ID or Export ID. These PERQS buttons allow you to import and export data using Excel. This section will explain how to use these functions.
Exporting and changing the location number
Sometimes the number used to identify your locations can vary from one year to the next. PERQS allows you to overwrite the number directly in the questionnaire and gives you the option to import the number from another, pre-existing spreadsheet.
If you want to use the import option, create another Excel spreadsheet with two columns: one column containing the old identification number and another column containing the updates (see Appendix B).
Click on Recode ID and select the spreadsheet containing this information. PERQS will open the file and update the number of locations using the information collected.
If necessary, PERQS will allow you to export the identification numbers currently in your system to another Excel file. When you use the Export ID option, PERQS can create a new Excel file requesting the identification of a location for your new file. The new file is saved and you return to PERQS.
This new file will contain a complete list of numbers already in PERQS, as well as the names of columns already identified to facilitate the future import of these files.
For users with another spreadsheet program (such as Lotus), please refer to Appendix C for information on how to convert from Lotus to Excel.
Exporting and/or importing data
If you have most of the information required by the questionnaire in another Excel spreadsheet, PERQS gives you the option of importing this information.
To import information, you must have an Excel spreadsheet that has specific names for its columns in the first row (see Appendix A). The system will use the names of the rows to update the data.
To use the import function, click on Import and select the spreadsheet containing the updated information. PERQS will open the file and update the location data. It will use the identification number of the location to merge the spreadsheets.
When PERQS discovers new locations during the process (i.e., the ID number of the source file does not correspond to any record presently on PERQS), it will automatically add it to the end of the questionnaire.
PERQS will allow you to export the data presently in the system to another Excel file. When using the Export option, PERQS will create a new Excel file and ask you to identify a location for your new file through Explorer in Excel. The new file is saved and you return to PERQS.
The new file will contain a complete list of numbers already in PERQS, as well as the names of already identified columns to facilitate future importation of these files. Columns labelled ADDRESS, CITY, PROVINCE and PCODE are blank white columns on your questionnaire.
For users with another spreadsheet program (such as Lotus), please refer to Appendix C for information on how to convert from Lotus to Excel.
Closing the questionnaire
Once the questionnaire is completed, click on the Save or on the Close button to save your changes or exit the questionnaire. When you click on this button, this window (Figure 8a) will appear:
Figure 8a
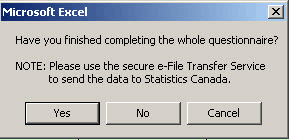
If the questionnaire is fully completed, click on Yes and the questionnaire with your information will be saved.
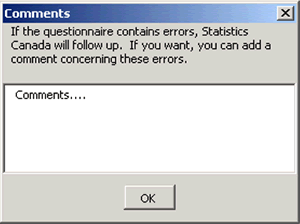
Consistency errors in your questionnaire (see Figure 8b) will also appear. If you do not want to correct these errors, you can add a comment concerning these errors (see Figure 8c).
If you have not finished completing the questionnaire, click on No and the information will be saved. Cancel will take you back to the application.
Figure 8b
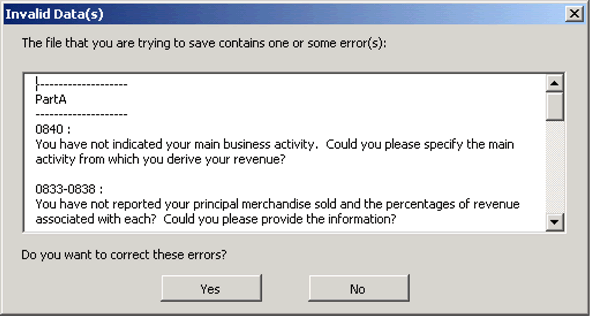
Figure 8c
Returning your company data to Statistics Canada via Internet
Once you have completed the survey and you are ready to return it to Statistics Canada via the Internet, you must execute the e-File Transfer Service to upload PERQS.
Accessing the e-File Transfer Service
1. From the Internet, go to URL http://www.statcan.gc.ca/ec-ce/eft-tef.
2. Enter username provided by Statistics Canada.
3. Enter your password, then click Logon.
4. You will see a list of safes.
5. Click on your safe.
6. To upload files to Statistics Canada, click ToStatcan-->Upload file , then Browse for the file you want to upload (e.g. Q11111111.xls).
7. Once you have chosen the file, click on the Upload button.
8. Logout.
Note : if you have a problem using the e-File Transfer service, please send an e-mail to the support team at: SOS@statcan.gc.ca
Appendix A
| Column Header | Description | |
|---|---|---|
| Column 1 | SNUMBER | Location ID (from Statistics Canada) |
| Column 2 | COMPID | Location ID (do not exceed 8 characters) |
| Column 3 | OPNAME | Operating name |
| Column 4 | ADDRESS | Name of street |
| Column 5 | CITY | City |
| Column 6 | PROVINCE | Province or territory (2 characters)* |
| Column 7 | PCODE | Postal code |
| Column 8 | C2080 | Total operating revenue |
| Column 9 | C0876 | Gross leasable area |
| Column 10 | C0875 | Unit of measurement (1 = square feet; 2 = square meters) |
| Column 11 | C0873 | Part year operation (1 digit) 1: Seasonal operation; 2: New store; 3: Change of fiscal year; 4: Change of ownership; 5: Ceased operations; 6: Temporarily closed; 7: Moved |
| Column 12 | C0871 | Part year operation from (6 digits) yyyy/mm or leave blank |
| Column 13 | C0872 | Part year operation to (6 digits) yyy/mm or leave blank |
| Column 14 | NAICS | NAICS (North American Industry Classification System) (6 digits) |
| Column 15 | C9921 | Comments |
Numeric columns:
C2080, C0875, C0876, C0873, C0871 and C0872.
| Province | *Code |
|---|---|
| Newfoundland and Labrador | NL |
| Nova Scotia | NS |
| New Brunswick | NB |
| Prince Edward Island | PE |
| Quebec | QC |
| Ontario | ON |
| Manitoba | MB |
| Saskatchewan | SK |
| Alberta | AB |
| British Columbia | BC |
| Yukon | YT |
| North West Territories | NT |
| Nunavut | NU |
Appendix B
To import data in PERQS, you must use Excel 97 or higher. In order for PERQS to import your data correctly, please indicate the names of the following columns in the first row of your Excel spreadsheet.
| Column Header | Description | |
|---|---|---|
| Column 1 | OLDID | Old Location ID |
| Column 2 | NEWID | New Location ID (do not exceed 8 characters) |
Appendix C
As mentioned in this guide, you may only import and export if your data currently exists in an Excel 97 spreadsheet or higher. However, if your data exists in a different format your software may convert to Excel. Conversion to Excel is possible for Lotus and Microsoft Access.
For users who have other types of software, please consult your software documentation to find out whether it is possible to convert to Excel 97 and follow those instructions.
Lotus to Excel
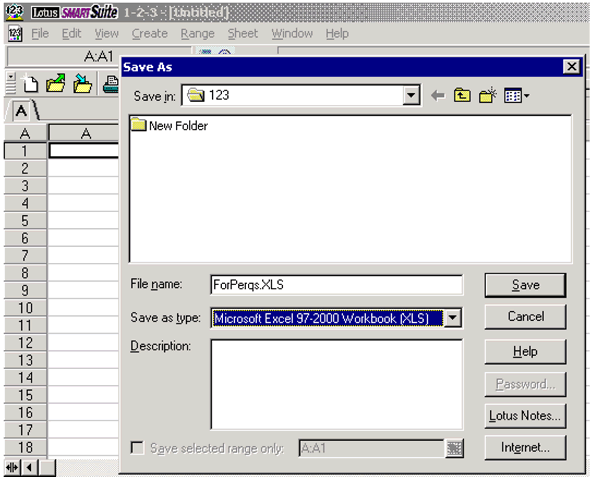
To convert from Lotus to Excel, you must use the command Save under and click on File in your Lotus tab. Please save the spreadsheet in Excel 97 format (see figure 9a).
Figure 9a
Microsoft Access to Excel
To convert from Microsoft Access to Excel you must select your data and use the command Save as under File on your toolbar (see Figure 9b).
Figure 9b
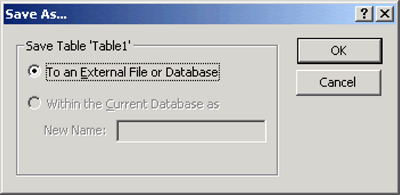
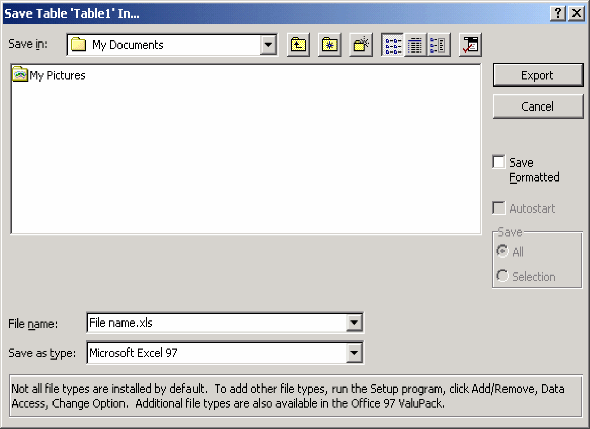
After choosing the option to save to the external file, you must save your data in Excel 97 format by selecting Microsoft Excel 97 (*.xls) as the type of file (see Figure 9c).
Figure 9c
Appendix D
Using Excel 2007 to open the questionnaire and use the macros
Open the questionnaire with the Microsoft Office button, menu Open, and then find the questionnaire using the Excel explorer.
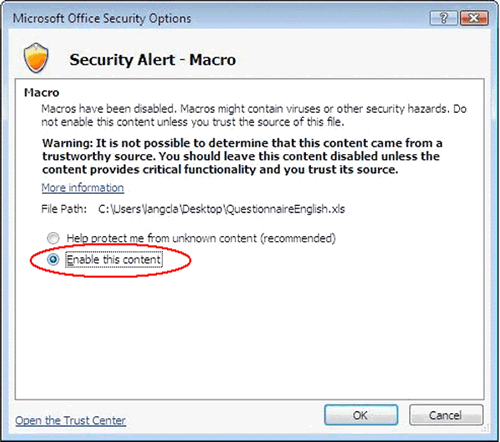
To activate the macros, use the Options… buttons which will be found on the security warning tool bar (Figure 10a). Once the Microsoft Office Security Options window has open, choose the option: Enable this content (Figure 10b). This will open the questionnaire and data entry can begin.
Figure 10a
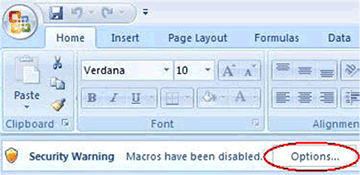
Figure 10b
Finding additional buttons when accessing Part A and Part B of the questionnaire
To manoeuvre more easily once in either Part A or Part B of the questionnaire, use the Add-Ins ribbon, see Figure 10c.
Figure 10c
(Part A)

(Part B)

Using Excel 2010 to open the questionnaire and use the macros
Open the questionnaire with the Microsoft Office button, menu Open, and then find the questionnaire using the Excel explorer.
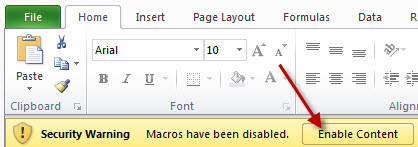
To activate the macros, click on the security warning tool bar (Figure 10a). Once the Microsoft Office Security Options window has opened, click on the button Edit Anyway (Figure 10b). Then choose the option: Enable this content (Figure 10bb). This will open the questionnaire and data entry can begin."
Figure 10a

Figure 10b
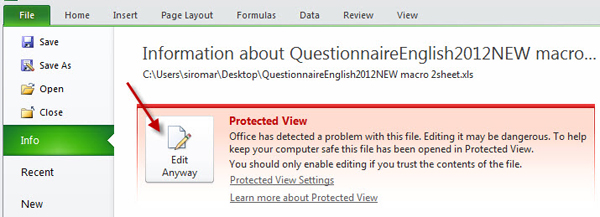
Figure 10bb
Finding additional buttons when accessing Part A and Part B of the questionnaire
To manoeuvre more easily once in either Part A or Part B of the questionnaire, use the Add-Ins ribbon, see Figure 10c.
Figure 10c
(Part A)

(Part B)

Thank you!